In this tutorial, we will understand how to use payment widget in your website using a news paywall example
Resources
| Source Code | https://github.com/blockonomics/news-paywall |
| Youtube Video | https://www.youtube.com/watch?v=Bwqf3Gx_wfY |
Tech Stack
- Python (Django)
- SQLite
- HTML/CSS/Bootstrap
Setting Up
The entire code for this demo is available on GitHub and you can fork it here. The step by step instructions on how to set up the demo is provided in the README. Once you have completed the setup, you can now navigate to http://127.0.0.1:8000/ to see the demo live.
Payment Widget Vs Payment Button
| Payment Button | Payment Widget |
| Only using Pop-Up Window | Can be embedded in any part of html |
| User details can be provided only from User Interface (UI) | Both User Interface (UI) and Application can provide the user details |
| Blockonomics will take all the input form fields from the customer | You have to pass the customer field values to Blockonomics |
| Restrictions on modifying look feel | Can be customised to tightly match your website theme |
So from the above table you can comprehend that the payment widget provides you way more options to customise your payment widget in your website, so if you want to use the payment interface in your website adapting to the theme of the website, you can go ahead with payment widget. But, if you do not much worry about the payment interface, you can simply embed the payment button in your website which is much easier as it take all the input fields from the user on its own. The blog for Payments Button can be found here.
The Logic
While doing the setup you may have embedded the payment widget in your website, you can read more about the setting up of payment widget here. If you are looking for a demo for the payment widget, you can visit this link. Besides this it is also important to configure the Database and understand the logic for the Order Hook URL endpoint.
Database Configuration
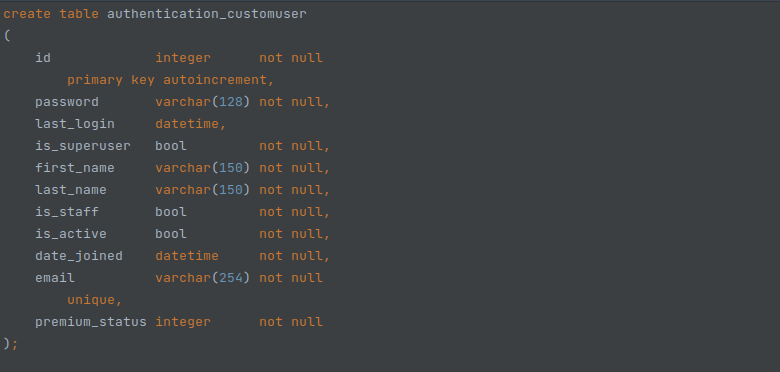
As we are using the Payment Widget, all the details of the user should be provided by us to Blockonomics so in this demo case we just need an extra email field for the user and a premium status field which will exactly match the status code of the transaction made by that user, So with the help of the premium status field we would easily distinguish between a premium user and a non-premium user.

Order Hook URL and Redirection URL
It is really important to understand the meaning of the above terms before you code your logic.Order Hook URL – is the endpoint that is used by Blockonomics to provide you status update notifications of the transactions done using Payment Buttons/Links you created.Redirection URL – is the endpoint on which the user is redirected once the transaction is carried out. This does not mean the transaction was successful, and thus your redirection URL should NOT point towards the paid content.
You should unlock the premium content only upon the confirmation received on the Order Hook URL from Blockonomics.
Order Hook URL Endpoint Logic
Blockonomics hits the endpoint with a GET request, passing the Bitcoin address and the status of the transaction carried using the given address.
We can use the Get Order API to know the details about the user who used the given bitcoin address to perform the transaction. Email can be used as a source of identification but you can pass any logic as you like. Here, we identify the user using the email and update the premium status of that user with the one that Blockonomics provided.
def payment_webhook(request):
    if request.method != 'GET':
        return

    status = request.GET.get('status')
    uuid = request.GET.get('uuid')
    headers = {'Authorization': "Bearer " + settings.API_KEY}
    response = requests.get('https://www.blockonomics.co/api/merchant_order/%s' % uuid, headers=headers)
    data = response.json()
    user = User.objects.get(email=data.get('data').get('emailid'))
    user.premium_status = int(status)
    user.save()
    return HttpResponse(200)
JavaScript Payment Notification
Using the Order Hook URL we will be only able to update the Back-end ( Database ) of the Website, while the Front-end (HTML,CSS) needs to be reloaded so that it can fetch the newly updated data. To do that, Blockonomics have provided a great solution which is using JavaScript Payment Notification which will be called when the payment status gets updated each time. So in this website we are waiting till the status becomes 2 (i.e) The Confirmed State then we are reloading the website to re-fetch the updated data and show the data to the user accordingly with the newly fetched data. Below is the code which is responsible for this process.
        // To Reload on payment success so that the user can see the premium content
        window.blockonomicsPaymentCallback = function (payment) {
            if (payment.status === 2) {
                setTimeout(() => { window.location.reload() }, 3000);
            }
        };
The END
Thus, we have configured the payment widget in our website and made a listener to callback URL which will update the premium status of the user, with which we can grant access to premium content for the user.